4 Brilliant Levels For Bug-Out Organization
By Jeanette Vale
Did your grandma ever tell you, “Take care of your things and your things will take care of you”?
It’s great advice.
A step further: “Organize your bug-out-system and give every item a specific place in your bags”.
Can you find items, even in the dark?
I mention the word “system” not just bug-out-bag. Truly, it’s going to take more than just a backpack to keep one alive comfortably.
There is an exception and that is the bushcraft folks.

Bushcrafters know how to survive, and usually with one backpack. They have done the work of learning how to eat, drink, shelter and survive in all four seasons.
Most of us don’t have this education so we pack more. That’s okay (maybe), just put wheels under the load. Still, try to pack as little as possible.

Here is an image of my system.
Plan how you will build your system. What bag sizes do you need? How many bags will this system consist of? What items go where and why?
4 EVACUATION LEVELS
FIRST LEVEL, fanny pack, purse, or I chose a vest.
SECOND LEVEL this bag is small but contains all things you need often. I call it the “Front Loader”.
THIRD LEVEL This is the large backpack.
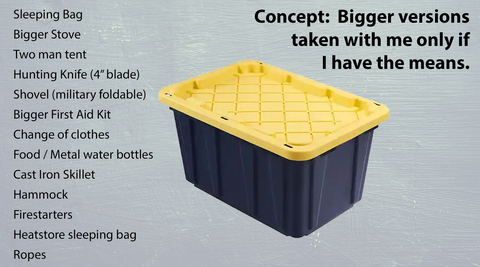
FOURTH LEVEL (for me) is a tote. It has everything big.
It's the deluxe version but if I don’t take it with me, I will still survive, just not as comfortably.
At the least, always carry Level 1. Let’s look closer at these four levels.
FIRST LEVEL:
A vest with many pockets. Duluth makes a fantastic vest, however it’s not breathable and can get hot. But its heavy duty fabric. 96% Nylon, 4% spandex. Interior mesh 100% polyester.

This keeps my shoulders and hands free.
Note: This vest hangs ready to go at all times. IF I don’t have any other part of my system, and I only have this vest, I have a knife, saw, and fire. That is important! But I must have skills in place or someone will find me dead in a nice Duluth vest.
Before you evacuate, throw in your cell phone, ATM or credit cards, etc.
Another major reason for a vest is that it covers my gun harness which I wear outside of my shirt, in the open. With the vest on, it is no longer in the open, it is covered but easy to draw because I don’t zip the vest shut. My front loader covers the gun. What is a front loader?
SECOND LEVEL
The Front loader bag. A bag worn on your front. Attached any way you can. 
Q: What do you fill the front loader with? A: The things you do and touch most often.
How to plan this bag: Make a map of your movements.
On a normal day, what do you do from the time you wake up to the time you go to sleep?
What do you touch? What rooms do you go into?
The reason you are making a map of your movements is that even in a bug-out situation, you are going to be doing most of the same things. Sanitizing, drinking, eating, etc.
Do you want to take your backpack off to constantly dig through it? If you’re stressed and evacuating, the answer is probably, no.
If you are in a transport situation, you might be separated from your bigger backpack, at least you are hugging this smaller bag and it has everything that you are accustomed to having at your fingertips.
The contents satisfy:
I’m hungry, I’m thirsty, my lips are chapped, my glasses, my keys, I’ve a headache…you get the idea. All of it is accessible, fast.
What to use as a front loader.
I found a small yellow hydration backpack. The plastic bladder bag inside had broken. I bought a new one and inserted it. We sell these inserts. I made this into my front loader.

EZ Hydration Bag TIP: These bladder bags can leak. Protect the straw components. Hiking jostles it about and can be pretty rough.

I have a full first Aid Kit, but it's too big for my front loader. So I keep one or two URGENT items in the front loader.
For example:
A person is heavily bleeding: I have a bandage that clots and stops heavy bleeding. This piece is stored in my front loader where I can get to it in one second, Vs. me taking off my big backpack and ripping through it to get to that bandage when seconds matter in saving life.

It is a lot of work but losing your stuff and then losing your mind takes up way more energy. When I am done with any item, it is put back in its proper pocket.
On Thanksgiving Day I hiked with my siblings and we tested our gear. I took only this front loader with me. I found what to adjust. You must test your gear! What is it like using it in real life?
So this bag now has a Seychelle bottle and the foldable hand saw (taken out of the large pack on my back) because I noticed I wanted those items and they were not on me.

The Seychelle bottle is Important because you can fill it, and squirt the purified water into another storage chamber. Your other option with some filter bottles? sucking water through a filter straw and spitting it into your pot to cook your food. No thanks!
TIP: Make big reminder notes of what you need to do before you run.

Real quick: let’s talk about guns. Where is my gun in all of this?

I use the Tactica elastic belly band holster. Despite the flex, the gun slides and snaps into a hard shell that fits the contours of the gun perfectly. The gun’s trigger is protected by the hard shell.
It lays flat against my stomach, and it hides under this yellow front loading bladder bag. I have fast and easy access to it.
I am not able to accidentally pull the trigger and shoot the hiker next to me. The gun doesn’t slide out by accident either. I just wear this gun holster over my shirt (as shown).
My vest hides the gun and so does the yellow backpack.
Let's continue:
THIRD LEVEL

Hikers backpack: only weighs 29 lbs. With my system I can survive four seasons. Even sub zero temps! . My shirt is made with 1 inch foam and I can be warm in 60 degrees below zero. You need to know about foam clothes (blog). If I fall into a river, I can still sleep in the same clothes that night.
I sewed my own. But you can buy them made from Fortress Clothing. However, a pair of their pants will run you over $200.
Making the clothing yourself is so much cheaper! It will require buying sheets of open cell foam. And stretchy polyester fabric. I give general directions on how to make this system in the blog linked above.
Thousands of people who live in very cold places will be without heat this winter. Foam clothing is superior to the best winter clothing sold in stores. It is also superior to animal skins/furs because if you get your skins wet, they could be wet for many hours (or days).
Life saving tip!
The foam found in car seats, airplane seats, patio furniture, your couches, is the foam used in this miracle winter tech. IF you have to tear up chairs to stay warm and alive, do so.
The foam needs to be directly against your skin. If you don’t obey this principle the foam is not worth the bother. stuff it into your shirt and pants, protecting vital organs. Read more here.
Let’s talk about pillows, since I just tested mine–and it about killed me. I bought an inflatable neck pillow and tested it with the air mattress. So important to do!

My neck and spine went crazy! A few minutes laying on the system was so painful! I had to find a horse to kick me back into alignment.
Can you imagine if I found this out while trying to sleep away from home, knowing I had more surviving to do for days?!
A REAL pillow now makes my list! Strangely, my sleeping bag is not a priority. Simply because it doesn’t fit. I would rather have my foam clothes. I don’t have room for both.
Between my hikers backpack, my front loader, my vest, AND boots, I am carrying 46 lbs. I know that is too heavy. But it’s not bad for a four season system.
Since I can’t really carry that much weight for long, I might as well get something with wheels. And my black tote (with yellow lid) fits well! This is the FOURTH LEVEL
The fourth level asks, what would I really love to have? And that is it. I am not allowing myself to have any more than these four levels.
- The vest
- The Front loader
- The hikers back pack
- The plastic tote. (Black / Yellow)
And here are the wheels if I ever have to huff it.

This Viking Solution Deer cart works great as long as a car is pulling it. It came with two different hitches, which is super. It is a heavy cart, if I have to be the horse.... Neigh.
I loaded my stuff and covered it with a tarp. It looked like a dead body was underneath. Which gave me a great idea for deflecting marauders. Obtain a severed arm (rubber Halloween prop) Have the arm dangling out from under the tarp.
dress and look the part of someone who has been through a zombie apocalypse (which might not be difficult in a real global meltdown). Pull the cart to any destination you need to reach. Yell out occasionally, "Plague.....bring out your dead!".

I promise you, no one will rob you, or kill you (because they want you to keep walking). You will be given a fifty foot radius of peace and quiet and you can use all the nice roads. No skirting through mountain passes to avoid the pillaging gangs. Image taken from Monty Python (1975)
We've got to laugh. This world is getting way to serious. My system isn't perfect, but there it is. I'd love to hear about yours! Come visit us! www.EmergencyZone.com
Leave a comment